Hướng dẫn tích hợp, add disqus comment cho blog, web
Disqus là gì ?
Disqus là một hệ thống bình luận (comment ) tốt , cùng sự kết hợp đăng nhập bằng facebook, google plus, twitter,... Giúp cho bạn tiết kiệm được thời gian để tạo ra những comment từ facebook, google +, ... .Chỉ cần bạn cài disqus thôi đủ. Hồi trước , khi chưa biết đến disqus tôi phải cài đặt vào blog của mình nào là google +, facebook, làm rất là cực khi phải là nhiều thứ để có nó. Mà còn làm cho trang blog của tôi không được đẹp, và bất lợi cho người comment phải chọn lựa comment bằng mạng xã hội nào.Ưu điểm của disqus:
- Phòng chống spam bot comment.
- Dễ dàng quản lý và theo dõi tại Dashboard riêng.
- Người dùng có thể đăng nhập và bình luận bằng tài khoản Facebook, Twitter .
- Giao diện đẹp.
- Bạn có thể kiếm tiền bằng cách chèn quảng cáo dưới Disqus.
Nhược điểm của disqus
- Không thu hút bình luận.
- Ảnh hưởng đến tốc độ tải trang.
- Không thể Việt hóa email thông báo qua email.
Hướng dẫn add, tích hợp disqus comment cho blog
B1: Đăng kí tài khoản disqus tại link : https://disqus.com/profile/signup/Bạn có thể đăng kí disqus bằng facebook, twitter, google
B2: Điền thông tin trang blog của bạn, URL, category
B3: Chọn mục mà bạn muốn tạo disqus comment vì tôi muốn tạo cho blog nên tôi chọn blogger , còn bạn muốn tạo cho cái gì bạn hãy chọn cái đó.
B4: Bạn chỉ việc bấm thêm tiện ích vào blog bạn muốn thì nó sẽ tự động cập nhật cho bạn
B5: Vào trang quản trị của blog , vào blog bạn đã cài disqus comment , vào bố cục và chọn tiện ích bạn đã thêm vào đến đúng nơi bạn muốn để. Phần lớn được để sau nội dung bài viết bạn muốn comment .
Hướng dẫn add, tích hợp disqus comment cho wordpress
Bạn làm tương tự như Hướng dẫn add, tích hợp disqus comment cho blog đến bước 3.B4: Chèn disqus comment cho wordpress
Để chèn vào WordPress bạn chỉ cần cài đặt plugin Disqus Comment System vào và nó sẽ tự thay thế form comment cũ của WordPress thành form comment của Disqus, đồng thời thay đổi số lượt bình luận bên trong bài viết thành bộ đếm lượt comment của Disqus.
Sau khi cài đặt plugin Disqus Comment System, bạn vào phần Comments trong WordPress Dashboard để kích hoạt Disqus bằng cách đăng nhập vào tài khoản Disqus.

Kế tiếp là bạn chọn địa chỉ Disqus cho website đã tạo ở bước 1 và ấn Next.
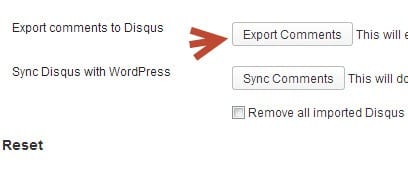
Cuối cùng là nhấp vào link Export now để chuyển toàn bộ bình luận cũ của WordPress sang Disqus. Quá trình này có thể lâu hay chậm tùy vào số lượng bình luận mà các bạn đang có.
Lưu ý rằng trong khi nó đang chuyển, bạn không nên chuyển sang trang khác mà nên giữ nguyên trang đó đợi nó làm xong nhé.
Lúc này vào bài viết xem thì khung comment của bạn đã được chuyển sang hệ thống của Disqus rồi.
Để quản lý các bình luận, bạn có thể truy cập vào WordPress Dashboard -> Comments -> Disqus nhé, hoặc truy cập vào thẳng trang chủ http://disqus.com.
3. Hiển thị bình luận ngoài trang chủ.
Sau khi cài Disqus xong, bạn có thể thấy chỗ hiển thị số bình luận trong bài viết sẽ được hiển thị ra trùng khớp với số lượt bình luận của Disqus, nhưng khi ra ngoài trang chủ thì có thể nó sẽ bằng 0 mặc dù là bạn có rất nhiều bình luận.Để khắc phục điều này, bạn chèn đoạn code sau vào file functions.php
function disqus_embed() {
wp_enqueue_script('disqus_embed','http://'.$disqus_shortname.'.disqus.com/embed.js');
echo '<div id="disqus_thread"></div>
<script type="text/javascript">
var disqus_shortname = "'.$disqus_shortname.'";
var disqus_title = "'.$post->post_title.'";
var disqus_url = "'.get_permalink($post->ID).'";
var disqus_identifier = "'.$disqus_shortname.'-'.$post->ID.'";
</script>';
}

add_action('wp_head','disqus_embed');

function disqus_count($disqus_shortname) {
global $post;
wp_enqueue_script('disqus_count','http://'.$disqus_shortname.'.disqus.com/count.js');
echo '<a class="num_comments_link" href="'. get_permalink() .'#disqus_thread" data-disqus-identifier="'.$disqus_shortname.'-'.$post->ID.'"></a>';
}
Bây giờ bạn mở file index.php hoặc content.php (hoặc chỗ nào mà bạn muốn
hiển thị comment). Tìm đoạn code hiển thị số comment của WordPress và
thay bằng.show_disqus_cm('######');
Hãy đổi ###### thành Forum Shortname của bạn nhé. Nếu chưa biết Forum Shortname của bạn là gì thì vào Comments -> Disqus -> Plugin Settings là thấy.
Đối với Thesis
Nếu bạn đang dùng Thesis thì hãy chèn đoạn code này vào file custom.php
function disqus_embed($disqus_shortname) {
global $post;
wp_enqueue_script('disqus_embed','http://'.$disqus_shortname.'.disqus.com/embed.js');
echo '<div id="disqus_thread"></div>
<script type="text/javascript">
var disqus_shortname = "'.$disqus_shortname.'";
var disqus_title = "'.$post->post_title.'";
var disqus_url = "'.get_permalink($post->ID).'";
var disqus_identifier = "'.$disqus_shortname.'-'.$post->ID.'";
</script>';
}
function add_disqus(){
if (is_singular('post')) {
related_posts();
}
disqus_embed('######');
}
add_action('hook_after_disqus','add_disqus');

/*Show disqus comment count */
function disqus_count($disqus_shortname) {
global $post;
wp_enqueue_script('disqus_count','http://'.$disqus_shortname.'.disqus.com/count.js');
echo '<a class="num_comments_link" href="'. get_permalink() .'#disqus_thread" data-disqus-identifier="'.$disqus_shortname.'-'.$post->ID.'"></a>';
}

function show_disqus_cm() {
disqus_count('######');
}
add_action('hook_after_disqus_comment_count', 'show_disqus_cm');
Nhớ thay ###### thành Forum Shortname của bạn luôn nhé. Bây giờ bạn vào Thesis -> Skin Eidtor và tìm rồi thay đổi như sau:
Tìm box Number of Comments (màu đỏ) và xóa đi, sau đó tạo một box HTML Container bỏ vào, sau đó ấn vào nút settings bên cạnh box rồi chuyển qua tab Admin, điền disqus_comment_count vào phần Hook Name.

Tiếp tục mở qua tempate Single, tìm box Comment Form và xóa đi, sau đó thay bằng một box HTML Container và đặt Hook Name là disqus.

.jpg)


.jpg)
